Introduction
Circle theorem rules are an important part of Secondary and O Level E Maths. Students are often expected to identify the correct theorem from a diagram, calculate an unknown angle and support their working with a valid geometrical reason.
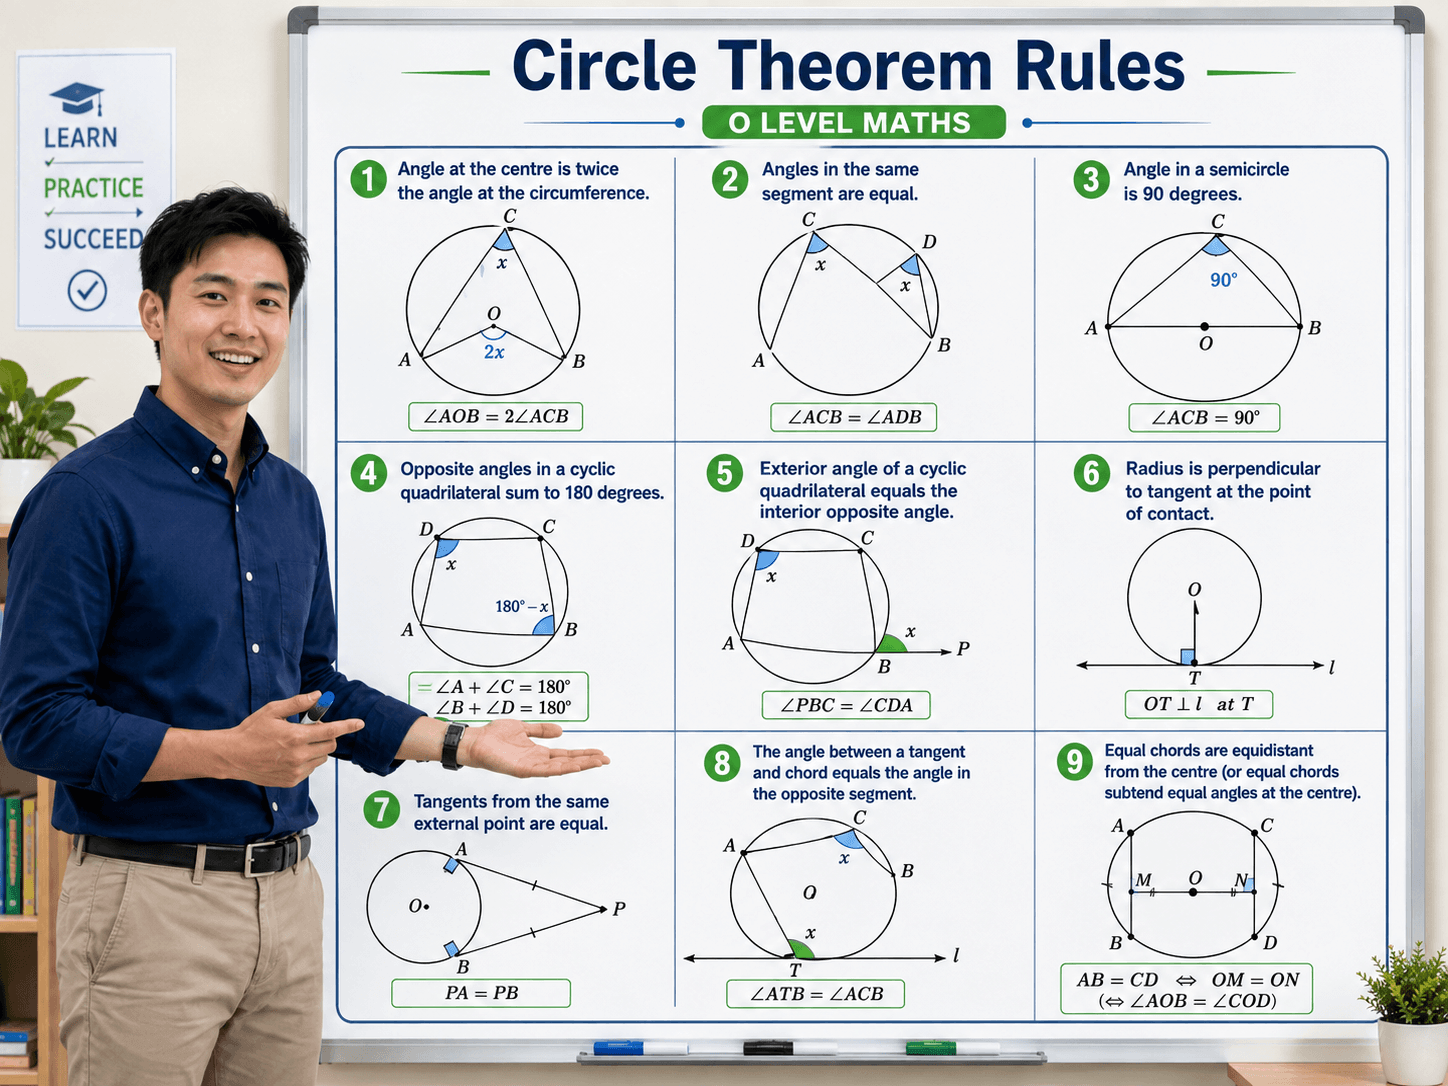
In this lesson, Coach Syahira explains nine useful circle theorem rules covering chords, tangents, radii, semicircles, angles in the same segment and cyclic quadrilaterals.
Learning the statements alone is not enough. Students must also understand the diagram clues that tell them which circle theorem rule to apply.
The Question / Scenario Explanation
Source: Nine circle theorem rules that O Level students should revise carefully.
Circle theorem questions may present students with a circle containing chords, tangents, radii, a diameter or a quadrilateral. The task is usually to find one or more unknown angles using the information shown.
Before calculating anything, students should inspect the diagram for clues such as:
- equal chord markings;
- a line passing through the centre;
- a tangent touching the circle at one point;
- a diameter forming the base of a triangle;
- angles standing on the same chord or arc; and
- four vertices lying on the circumference.
These visual clues help students select the correct theorem instead of guessing.
Step-by-Step Solution / Explanation
Rule 1: Equal Chords Are Equidistant from the Centre
If two chords in the same circle have equal lengths, their perpendicular distances from the centre are equal.
For example, if chord \(AB\) and chord \(CD\) are equal, then the shortest perpendicular distance from the centre \(O\) to \(AB\) is equal to the shortest perpendicular distance from \(O\) to \(CD\).
This rule also works in reverse: chords that are equally distant from the centre of the same circle are equal in length.
Rule 2: The Perpendicular Bisector of a Chord Passes Through the Centre
A line drawn perpendicular to a chord through its midpoint passes through the centre of the circle.
Therefore, when a line cuts a chord into two equal parts at \(90^\circ\), students can conclude that the line passes through the centre.
This theorem is especially useful when the centre is not initially labelled in the diagram.
Rule 3: Tangents from the Same External Point Are Equal
Suppose two tangents are drawn from an external point \(P\) and touch the circle at \(A\) and \(B\). Then:
\( PA = PB \)
This creates an isosceles triangle \(PAB\). Therefore, the base angles at \(A\) and \(B\) are equal.
Students should look for two tangent lines beginning from the same point outside the circle.
Rule 4: The Line from the Centre to the External Point Bisects the Angle Between Two Tangents
When two tangents are drawn from the same external point \(P\), the line joining \(P\) to the centre \(O\) bisects the angle between the tangents.
If the angle between the tangents is \( \angle APB \), then:
\( \angle APO = \angle OPB \)
The two triangles formed are congruent because the radii are equal, the tangent lengths are equal and \(OP\) is common to both triangles.
Rule 5: A Tangent Is Perpendicular to the Radius at the Point of Contact
A tangent touches a circle at exactly one point. The radius drawn to that point of contact is perpendicular to the tangent.
If a tangent touches the circle at \(T\) and \(OT\) is a radius, then:
\( \angle OTK = 90^\circ \)
This is one of the most frequently used circle theorem rules because it immediately creates a right angle.
Rule 6: The Angle in a Semicircle Is 90 Degrees
If a triangle is drawn inside a circle with one side as the diameter, the angle opposite the diameter is a right angle.
Therefore, if \(AB\) is the diameter and \(C\) lies on the circumference, then:
\( \angle ACB = 90^\circ \)
Students should first check whether the chord passes through the centre. If it does, that chord is a diameter.
Rule 7: Angles in the Same Segment Are Equal
Angles standing on the same chord or the same arc are equal, provided both angles lie in the same segment of the circle.
For example, if \( \angle ACB \) and \( \angle ADB \) both stand on chord \(AB\), then:
\( \angle ACB = \angle ADB \)
A useful memory phrase is: same chord, same segment, same angle.
Rule 8: The Angle at the Centre Is Twice the Angle at the Circumference
When an angle at the centre and an angle at the circumference stand on the same arc, the central angle is twice the angle at the circumference.
If \( \angle AOB \) is the angle at the centre and \( \angle ACB \) is the angle at the circumference, then:
\( \angle AOB = 2\angle ACB \)
Equivalently:
\( \angle ACB = \frac{1}{2}\angle AOB \)
Students must confirm that both angles subtend the same chord or arc before using this theorem.
Rule 9: Opposite Angles in a Cyclic Quadrilateral Add Up to 180 Degrees
A cyclic quadrilateral is a four-sided figure whose four vertices lie on the circumference of a circle.
Its opposite angles are supplementary. Therefore:
\( \angle A + \angle C = 180^\circ \)
and
\( \angle B + \angle D = 180^\circ \)
This theorem can also be used in reverse. If a pair of opposite angles in a quadrilateral adds up to \(180^\circ\), the quadrilateral is cyclic.
Key Concepts Students Must Know
- Chord: A straight line joining two points on the circumference.
- Diameter: A chord passing through the centre of the circle.
- Radius: A line from the centre to the circumference.
- Tangent: A line touching the circle at exactly one point.
- Point of contact: The point where a tangent touches the circle.
- Arc: A section of the circumference between two points.
- Segment: The region between a chord and its corresponding arc.
- Cyclic quadrilateral: A quadrilateral with all four vertices on one circle.
Students should learn both the theorem statements and the correct mathematical reasons used in written solutions.
Exam Tips / Common Mistakes
Exam Tips
- Mark all known equal lengths and right angles directly on the diagram.
- Check whether a chord passes through the centre before calling it a diameter.
- Look for equal tangent lengths when two tangents come from the same external point.
- Confirm that two angles stand on the same chord before applying the same-segment theorem.
- Write the theorem used beside each angle calculation.
- Combine circle theorems with basic angle facts such as angles in a triangle, angles on a straight line and angles around a point.
- When working with a cyclic quadrilateral, identify the opposite angles carefully.
Common Mistakes
- Using the wrong chord: Students sometimes claim two angles are equal even though they stand on different chords.
- Missing the point of contact: The radius is perpendicular to the tangent only at the point where the tangent touches the circle.
- Confusing radius and diameter: A radius reaches from the centre to the circumference, while a diameter crosses the entire circle through the centre.
- Doubling the wrong angle: The central angle is twice the angle at the circumference only when both subtend the same arc.
- Adding adjacent angles in a cyclic quadrilateral: It is the opposite angles, not every pair of angles, that add up to \(180^\circ\).
- Giving calculations without reasons: In geometry questions, unsupported working may lose method or reasoning marks.
Parent Insight
Circle theorems can feel overwhelming because students must remember several rules at once. However, strong performance usually comes from repeated diagram recognition rather than memorising long sentences without context.
Parents can support revision by showing a circle diagram and asking the student to name the visible clues before attempting any calculation. For example, ask whether there is a diameter, a tangent, an equal chord or a cyclic quadrilateral.
This encourages students to connect each visual feature to the correct theorem and develop a more systematic approach to geometry questions.
Conclusion
The nine circle theorem rules in this guide cover equal chords, perpendicular bisectors, tangent properties, semicircles, same-segment angles, central angles and cyclic quadrilaterals.
To use these theorems effectively, students should identify the important features of the diagram first, apply the appropriate rule and state a clear geometrical reason for every step.
Regular practice will help students recognise familiar diagram patterns more quickly and reduce careless mistakes during their O Level E Maths examination.
Visit our Secondary and O Level E Maths homepage: Explore SECMathsTuition
Read more Secondary Maths guides: Visit Our Maths Blog
Start here (limited slots weekly):
Free Trial: Click Here…
Enrol: Click Here…
Explore our main tuition brand approach here: Click Here…